Windows 10 Spotlight Images 2 Wallpapers Software

Spotlight Images 2 Wallpapers main window

Windows 10 was released with a nice cool feature called Spotlight.  Spotlight lets you have random nice pictures at lock screen of your computer or Windows tablet.

These pictures on your lockscreen will change every day, and if there is some picture you don’t like, you can just click where it says “Not a fan”, on right top corner of the screen and that image will just disappear. However, if you like the picture, you can click the “I want more” button and Windows will try to show you pictures within the same style.

If you get often bothered for having just one picture, you should definitely activate Windows Spotlight feature.

Although this is a very good feature, unfortunately it doesn’t let you save the showed pictures….Until now!!

Today I bring you Spotlight Images 2 Wallpapers FREE application!

Spotlight Images 2 Wallpapers main window

With this application you can save all the images that you have seen in your Windows Lock Screen.

This is a very simple and easy to use application. You just need to press the “Get Images” button and then choose what images to save, or just save them all!

You can opt to save only some images based on their resolution, or you can select just some images.

Tip: To select only a few images, press and hold CTRL key on your keyboard while clicking the image names in image list.

The images will be saved in a folder called “Spotlight Pictures” in your “Pictures” folder, but you can change this location using the “Browse” button to choose another location.

When you’re ready, just press “Save Images” and wait for the process to finish.

Simple as that! Oh and did I mention that IT’S FREE!!? 🙂

Please share your ideas and feedback on the comments bellow!

Download Spotlight Images 2 Wallpapers


Spotlight Images 2 Wallpapers

Spotlight Images 2 Wallpapers main window

Windows 10 was released with a nice cool feature called Spotlight.  Spotlight lets you have random nice pictures at lock screen of your computer or Windows tablet.

These pictures on your lockscreen will change every day, and if there is some picture you don’t like, you can just click where it says “Not a fan”, on right top corner of the screen and that image will just disappear. However, if you like the picture, you can click the “I want more” button and Windows will try to show you pictures within the same style.

If you get often bothered for having just one picture, you should definitely activate Windows Spotlight feature.

Although this is a very good feature, unfortunately it doesn’t let you save the showed pictures….Until now!!

With this application you can save all the images that you have seen in your Windows Lock Screen.

This is a very simple and easy to use application. You just need to press the “Get Images” button and then choose what images to save, or just save them all!

You can opt to save only some images based on their resolution, or you can select just some images.

Tip: To select only a few images, press and hold CTRL key on your keyboard while clicking the image names in image list.

The images will be saved in a folder called “Spotlight Pictures” in your “Pictures” folder, but you can change this location using the “Browse” button to choose another location.

When you’re ready, just press “Save Images” and wait for the process to finish.

Simple as that! Oh and did I mention that IT’S FREE!!? 🙂

Right Click Context Menu Adder 2.0

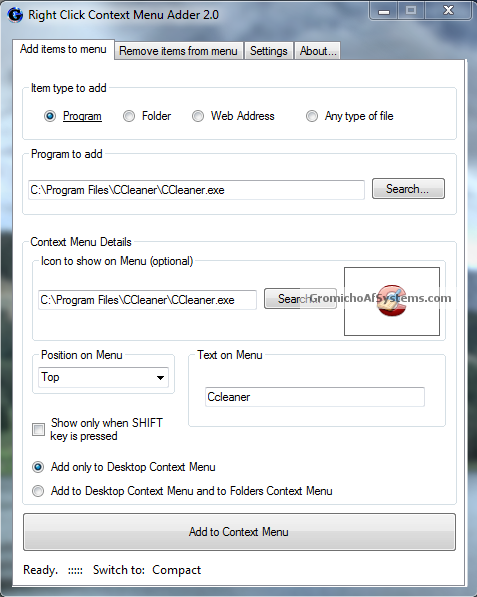
Right Click Context Menu Adder main window

Right Click Context Menu Adder it’s a free and portable utility which allows you to add your favorite program shortcut, website link, file or folder shortcut in Windows 7, 8, and 10 Desktop’s context menu quickly and easily. You will not need to modify Windows Registry yourself, this software will do the job for you.

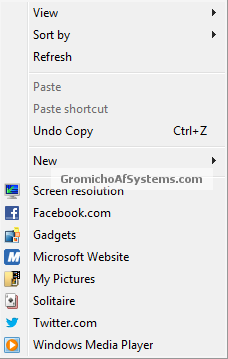
Following is an example of the output which you can get with the help of this awesome software:
Right Click Context Menu Adder example menu

As you can see in the above screenshot, we have added a link to Facebook.com and Microsoft Website. Also, we added a shortcut to My Pictures folder at My Documents, a shortcut do Solitaire Game, Windows Media Player and a link to Twitter homepage with the help of this freeware. This items were set to bottom position, however you can choose to show them at the top or middle in menu.

How to use it?

You just need to run this tool and select the desired item which you want to add in Desktop context menu. You can select any of
following items to add to context menu:

  • Program
  • Folder
  • Web Address
  • Any type of file

After selecting the desired item, provide required details such as program’s EXE file path, website URL, file name, etc. By default, the program icon is automatically selected from its EXE file but you can also select a custom icon. The program also allows you to customize the shortcut name which will be displayed in context menu. For website shortcut, you can also ask program to automatically retrieve its favicon which will be displayed in Desktop context menu.

This small utility also allows you to select the position of the new shortcut in Desktop context menu. You can select any of following positions:

  • Top
  • Middle
  • Bottom

If you select “Show only when SHIFT key is pressed” option, the new shortcut will only be shown in Desktop context menu when you press SHIFT key while right-clicking on Desktop. It’ll not be visible normally. So you can enable this option for those shortcuts which you don’t use regularly or want to hide from others.

You can also tell the software whether the new shortcut should be added to Desktop context menu only or should the software add the new shortcut to folder context menu as well. If you select the 2nd option, the shortcut will also be visible when you right-click on a folder.

Once a new shortcut is added, you can remove it later using 2nd tab. Simply select the desired item from the list and click on “Remove” button.

This software comes in 2 languages, English and Portuguese, however it supports multiple languages. So you can translate it to your language if you want to and share it with others.

We have also thought about people with small resolution screens!

If your monitor resolution is under 1024×768 pixels you might have noticed that the Right Click Context Menu Adder covers almost your full screen. For that, we added the option to switch to Compact mode and the Right Click Context Menu Adder will become smaller.

Just click at the bottom of the window of Right Click Context Menu Adder to switch to Compact Mode which will reduce the size of the window. Click on Extended text to return to normal size.

This software is highly customizable and works perfectly without any problem. The best thing is that its portable so you don’t need to install it. Simply run the EXE file and add desired shortcuts in Desktop context menu.

If you want to run this from a pen drive or other portable device, select the option to save the settings in File in program folder under the settings tab.

It can be used in both 32-bit and 64-bit Windows editions.